growing up, the italian side of my family was pretty influential... a few generations removed from italy, i was quite american, as my my dad married a non-italian girl making him pretty american (and obviously, that girl he married wasnt italian), but then there were my grandparents... neither was born in italy, but i believe their parents were, so they'd grown up pretty italian. and marrying eachother, they carried some of that into their own household. which means once i was old enough to spell, they would speak italian around me so that i didnt understand... (in hindsight, this excluded my mom as well... hmmm...)
anyway, despite my lack of any semblance of fluency in italian, there are certain words that i learned quite differently than you probably did...
we all know what mut-za-rell (mozzarella) is, but do you know what a ri-gut is? how about mana-gut? how about Jordan's favorite - gan-ool?
No? well, thats how my italian grandmother says ricotta (though, actually, we mostly called it pot cheese, which is apparently a cousin of ricotta...), manicotti and, jordan's favorite - cannoli...
and thats how i said all of those things until probably some time in high school when i discovered the Olive Garden or something...
anyway, whats my point? Oh, i'm getting there - i promise... anyway, when i was in high school, my father used to make us pastavazool... and just like manicotti and canolli before it, i had no earthly idea that it was not spelled the way it sounded. in fact, i dont think that i knew that it was something that anyone other than my family ate. i mean, it was called pastavazool for chrissake - my dad must have made that up, right? that word cant be real, can it?
So imagine my non-italian high-school boyfriends amusement when we were at his house one day, raiding the pantry, and i pulled out a can and asked him what 'pasta E fag-e-oli' was... he's all - 'are you kidding? your dad makes it all the time!' and i'm all like, 'HUH? thats how you spell that??? for real??? how in the world is pasta e fagioli possibly pastavazool???'
anyway, i dont know that i'd had pasta e fagioli since high school but during this past week, when it was snowing - YET AGAIN - i wanted something warm and hearty... and i got pasta e fagioli in my head and went recipe searching... yet nothing i found was really right. pasta e fagioli translates to 'pasta with beans', so why was i finding so many recipes with MEAT in them? or weird spices? or no tomatoes? or - the weirdest one of all - pureed beans? wha-? none of them lived up to my memory, so i set out to create my own... a little from here, a little from there and a lot from my memory...
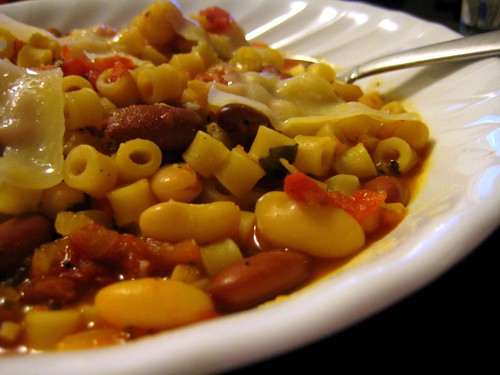
In the end, i dont know how close i was to what my dad used to make, but what i came up with is definitely "pasta with beans", heartier than a soup, 100% vegetarian (and would be vegan if you skip the parmesan on top) and exactly what a cold, snowy night calls for.
Pasta e Fagioli
courtesy of me
click here to import recipe directly into Pepperplate
~ 2/3 of a box of ditalini pasta
1 - 2 tbsp olive oil
3/4 of a vidalia onion, diced
1 small carrot, diced
1 small celery heart, diced
4 cloves garlic, smashed & roughly chopped
1.5 tsp minced fresh sage (or .5 tsp dried sage)
1.5 tsp minced fresh oregano (or .5 tsp dried oregano)
1 tbsp minced fresh rosemary (or 1 tsp dried thyme. dried rosemary isnt so great...)
1 tsp dried basil (or 1 tbsp fresh basil)
1 can stewed tomatoes (not drained)
2 c vegetable broth, divided (feel free to use chicken or beef broth if you are not vegetarian)
1 can diced tomatoes, drained
1 can cannelini beans
1 can red kidney beans
~ 12 turns of a pepper grinder - probably about 1/2 tsp if you do not have freshly ground pepper
1/2 tsp crushed red pepper (optional)
2 - 3 dashes tabasco (optional)
***
These directions are incredibly flexible. Below i'm giving you approximate cooking times, but all were determined by how long it took me to get to the next step...
Prepare pasta - cooking ~ 3 minutes less than the time indicated on the box for al dente pasta. Set aside.
In a large, heavy pot (i used this one) heat oil over medium - medium-high heat until it shimmers
dump in the onion, stir briefly to coat all with oil and let it cook while you chop up your carrot, celery and garlic. (for me, this was about 5 minutes...)
Add the carrots, celery and garlic & stir to combine. let it cook while you start chopping herbs - again, probably about 5 minutes. The veggies will be soft and might start to brown every so slightly.
Add the chopped herbs. I used the fresh/dried combination shown above because its what i had on hand... see my notes above about exchanges you can do between fresh & dried herbs...
mix and cook ~ 1 minute
Add the stewed tomatoes & their juices along with 1 c of the broth. Break up the tomatoes with a wooden spoon and allow to cook ~ 5 minutes.
Briefly remove from heat and puree ~ 1/3 - 1/2 of what is in the pot. You want to break up any large chunks of anything but not reduce it to mush... You can do this in a blender, food processor, with an immersion blender - whatever works for you - just be careful as the liquid is hot!
return the entire thing to the pot and return the pot to medium heat...
simmer 2 - 3 minutes.
add the drained diced tomatoes, the remaining cup of broth & both cans of beans (dont forget to rinse them)
along with ~ 12 turns of the pepper grinder (in a cooking class we took at Miette Culinary Studio we learned that fresh pepper should be used in a ratio of 3 turns of the grinder per serving as this is what most people will ask for in a restaurant. I always like to leave a little room, so i dialed it back to the equivalent of 4 servings worth of pepper because you can always add more later... and jordan did...)
add the crushed red pepper & tabasco, if desired. stir to combine and allow to simmer another few minutes.
Add the not-quite-cooked pasta, stir to combine and allow to simmer ~ 5 more minutes. Taste the pasta to ensure that it is cooked through and once it is, remove from heat.
Serve with freshly shaved parmigiano reggiano (if you have it or any other grated cheese if you dont) and crusty bread.
reheating note: this reheats fantastically. I packed some up for lunch - added a generous amount of parmesan cheese to it while it was still cold - and reheated it in the microwave at work for about 2 minutes, stirring once.
Showing posts with label beans. Show all posts
1.29.2011
1.07.2011
Black Bean Burritos
Posted by
kristen
Listen closely. Do you hear that sound?
That sound is the sound of my jeans getting just a little higher...
You know, mom jeans.
No, this isnt an annoucement of kitchenhell expansion but i'm pretty sure with this one, i've earned my suburban soccer mom credibility, just without the kids and the SUV...
Jordan was going to be out for the night. While i'd almost always rather he was around, it is nice to occasionally be the only opinion that i have to consider when picking dinner. (the irony is that he would have never said no to this one! ha!)
I was perusing Martha during my lunch hour to see what crazy concoction i would come up with and came across a recipe for bean burritos... and martha's recipe made 8 burritos and i was like, eh, i'll cut the recipe and make 4. and then i kept changing and changing and changing... and ended up with something that was much more my own. however, as a result, that halving the recipe thing? after all my changes and add ins, i ended up with a recipe for 10 burritos...
but thats ok - and this is where the suburban mom thing comes in - because martha, bless her heart, gives you instructions on how to freeze and reheat these suckers! so you know what that means, right? that means a fridge & freezer full of quick, healthy (protein, check, fiber, check, calories per burrito ~ 425, check!) and economical (it cost about $20 for all of the ingredients) meals! that i've become one of those people who cooked and then refrigerated and froze single servings so that they'd be easily available for brown-bag lunches or on a busy weeknight when the kids are hungry, the husband needs his shirt ironed, the dog needs a bath and mom needs a break! Calgon, take me away!
oh god, i think i just passed out from the image that was conjured...
Black Bean Burritos
courtesy of me, loosely based on Martha Stewart's Bean Burritos
1/2 c rice (dry)
1 tbsp olive oil
1 medium onion, diced
1/2 red bell pepper, cut in 1" strips
1/2 c rice (dry)
1 tbsp olive oil
1 medium onion, diced
1/2 red bell pepper, cut in 1" strips
4-5 garlic cloves, minced
1/2 jalapeno, minced (ribs and seeds removed, for less heat)
1/3 teaspoon ground cumin
2 tbsp tomato paste
10 burrito-size flour tortillas, 10 inches each
Cook rice & set aside.
Heat oil in a large non-stick pan over medium heat. Add onions, red pepper, garlic, jalapeno, cumin & chili powder; season with salt and pepper.
Increase heat to medium-high. Add beans and 1 1/2 cups water. Bring to a boil, & cook, stirring occasionally, until thickened, 10 to 12 minutes.
Heat tortillas by placing them on aluminum foil and then into the oven for about 3 minutes. Check to see if they are warm. Assuming they are, you are ready to make the burritos.
1/3 teaspoon ground cumin
1/3 teaspoon chipotle chili powder
Coarse salt and ground pepper
2 tbsp tomato paste
1 can (15 oz) diced tomatoes with jalapenos, drained
2 cans (15 ounces each) black beans, drained and rinsed
3/4 c water
1 c frozen corn kernels
1/4 c scallions, thinly sliced
10 burrito-size flour tortillas, 10 inches each
2 cups (8 ounces) shredded cheese, mexican blend
Salsa and sour cream, optional
***
***
Cook rice & set aside.
Turn oven on to 300°
Heat oil in a large non-stick pan over medium heat. Add onions, red pepper, garlic, jalapeno, cumin & chili powder; season with salt and pepper.
Cook, stirring occasionally, until golden, 10 to 12 minutes.
Add tomato paste & diced tomatoes, and cook, stirring, 1 minute.
Increase heat to medium-high. Add beans and 1 1/2 cups water. Bring to a boil, & cook, stirring occasionally, until thickened, 10 to 12 minutes.
Add corn; cook to heat through, 2 to 3 minutes. Remove from heat
Stir in scallions.
Heat tortillas by placing them on aluminum foil and then into the oven for about 3 minutes. Check to see if they are warm. Assuming they are, you are ready to make the burritos.
Fill each burrito with a scant 1/4 c of rice, ~ 3/4 c of bean mixture & scant 1/4 of shredded cheese, placing all at one end of the tortillia.
Fold up bottom and hold in sides. Starting from filled end, holding sides in as you work, tightly roll into a bundle. Place on the side, seam side down, and prepare remaining burritos.
Serve immediately, with salsa and sour cream, if using, or take martha's advice & wrap individually in plastic and freeze up to 3 months.
Reheating from refrigerator:
Place on plate and cover with another plate or a napkin. Microwave ~ 2:30. Burrito will be hot to handle. Allow to sit for a minute and then, if desired, wrap halfway in foil and eat from unwrapped end. If you are not wrapping, allow to sit for another minute or so to ensure you dont burn your hands.
Reheating from frozen - instructions per martha: (not yet tested by me)
Remove frozen burritos from plastic wrap. Place on a microwave-safe plate; microwave on high for 3 minutes. Transfer to baking sheet; bake at 450 degrees until crispy, about 10 minutes. If only using a microwave, remove from plastic wrap, and place on a microwave-safe plate, covered with a microwave safe bowl. Defrost at high power for 3 to 4 minutes; uncover, and microwave on high 3 to 4 minutes longer. If only using oven, remove burritos from plastic wrap; rewrap individually in aluminum foil. Place on a baking sheet; bake at 450 degrees for 40 minutes. Remove foil, and bake to crisp, 5 to 10 minutes. (To reheat defrosted burritos, remove any wrapping and bake for 10 minutes).
8.18.2010
Baked Black Bean & Corn Burgers
Posted by
Jordan
Ok readers (all 15 of you...) I'd like to introduce you to the artist formerly know as the Meat-Eater, aka, Jordan.
In the spirit of marriage and sharing, i've decided to give him full-on access to my prized baby blog*.
Since i'm giving him full access, this is the only time you'll see the intro header... aside from our very different writing styles (my overuse of () and ... and his overuse of ,s) you'll have to look at the bottom of the posts to figure out who's sharing.
(*seriously people, this is more significant than sharing a bank account. you're witnessing history here!!!)
Contrary to what might otherwise be said around here, or to how I've been labeled the "Meat-Eater," I don't have a compulsion to eat meat-related products with every single meal. Or even every day of my life.
Last year at some point, we were talking about how most veggie burgers make the mistake of trying to come off like they're made of beef, trying to fake what they really are, and how we really prefer things that don't try to disguise themselves, in this case black bean burgers. Some restaurants use them (either made themselves or frozen-and-bought) as their black bean burgers, and they're almost always better than the fake-meat stuff. So I went on a hunt for black bean burger recipes, and after a few changes we gave it a shot.
And they were good, but spicy as hell.
I like spicy foods, but they were almost too much for me. And they were too much for the other three people who tried them. So we shelved them...
Until last week, when I started talking them up again, and then talked Kristen into letting me give them a shot.
I made a couple of new changes, specifically using a Vidalia onion instead of whatever-we-happened-to-have-around (which usually means yellow or red onions), and it made all the difference. They were immediately declared part of the regular rotation around this place.
Next time up... What they're topped with....
Baked Black Bean & Corn Burgers
courtesy of LAURENMU on Allrecipes.com with modifications by Jordan
1 can black beans
1/3 to 1/2 Vidalia onion (depending on the size of the onion, you can eyeball it)
3 to 4 garlic cloves
1/2 cup corn (drained if you're using canned corn, which is totally fine)
1 egg
1 tablespoon chili powder
1 tablespoon ground cumin
1 teaspoon hot sauce (personally, I use Cholula, but you can use whatever you want)
1/2 cup bread crumbs
***
Preheat your oven to 375 degrees.
Mash the black beans with a fork until they're thick and pasty.
Finely chop the onion and garlic. Stir the onion, garlic, and corn into the mashed beans.
In another bowl, stir together the egg, chili powder, cumin, and hot sauce, then stir the egg mixture into the mashed beans.
Mix in the bread crumbs.
Divide the mixture into four patties, and place on a lined baking sheet.
Bake for 13 minutes, then flip and bake for another 13 minutes.
Serve on a hamburger roll. (In this house, we prefer Martin's Potato Rolls.)
Subscribe to:
Posts (Atom)