Showing posts with label condiments. Show all posts

6.20.2011

Waffles with Strawberry Conserve

This year we decided to skip a CSA share in favor of spending more time/money at the greenmarkets and picking and choosing our produce.  After 3 years as an active CSA member, this was a hard decision, but in the end, it really seemed like greenmarketing (yes, i just made that word up.  feel free to use it :) ) would better suit our lifestyle, plus, i wanted a chance to try out other farms & other products, something that the effort of using up our CSA share often prevented me from doing in the past.

In addition to picking up squash and greens and bread and even local beer, we've been very interested in seasonal fruit.  and right now, thats strawberries.  The greenmarket strawberries are better than anything you'll get in your local grocery store - they dont hold a candle, size-wise - but when it comes to flavor, they really cant be beat.  That little bit of knowledge makes them hard to pass up.

However, we're still us - meaning we still overbuy and underuse.  So when it rolled around to Friday and i realized that last weekend's strawberries were still in the fridge, i was kinda mad at myself...  how could we let those beauties go to waste?  Luckily, we have the crappiest refrigerator on earth - it near-freezes everything on the top shelf, while the rest is the correct temperature.  When it comes to forgotten foods, this can be a total blessing, as often things are preserved beyond their normal life.  So when i finally pulled out those remaining strawberries, they were a little bit past their prime, but nowhere near the mess they should have been, and the first thing that came to my mind was strawberry conserve.

I dont really know what the technical definition of a conserve is, but whatever, this stuff is REALLY good...  a couple of hours of passive time and a few minutes of active time yielded some of the best strawberry sauce i've ever had...  Of course, once you have a container of yummy strawberry stuff, you need something to eat it with (as eating it with a spoon, while yummy, isnt exactly advisable...) so I immediately declared there would be waffles the next morning.
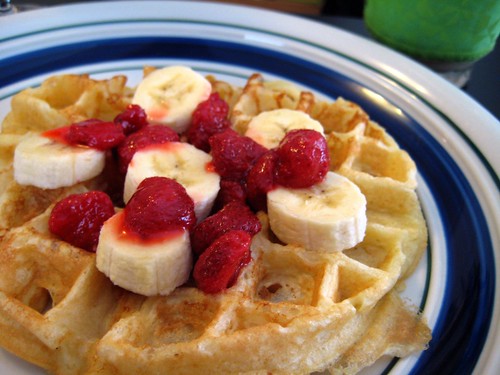
IMG_4572

We had it for breakfast, but its sweet enough that you could certainly make a pretty excellent dessert - especially with a scoop of vanilla ice cream - out of it...  Either way, you just need to make it soon.


Waffles with Strawberry Conserve
courtesy of Bon Appetit and Food.com with minor modification by me


For the conserve:
1.5 c strawberries, hulled & cut in half
1/4 c sugar
the peel of 1/4 of a lemon - including the pith (white part)

***

Place all ingredients in a saucepan, stir to combine and cover.
Let sit for 2 hours, stirring occasionally.  Strawberries will release juices and the sugar will melt into the juices.

Turn the stove on to medium and simmer for about 3 - 4 minutes.  Once berries have softened, remove them with a slotted spoon and place in a jar.

Continue to simmer the juice for 2 - 3 minutes, until it begins to thicken up a bit.  Remove from heat, remove lemon peel and pour the syrupy juice over the berries.

Seal the jar and refrigerate.


For the waffles:
1 1/3 c all purpose flour
4 tsp baking powder
1/2 tsp salt
1 tbsp sugar
2 eggs, separated
1/2 c butter (1 stick), melted
1 3/4 c skim milk
1/2 tsp vanilla extract

***

Combine flour, baking powder, salt & sugar in a bowl and whisk to combine.

Add the egg yolks, melted butter, skim milk & vanilla to the dry ingredients and stir to combine.

In a separate bowl, beat egg whites until they form soft peaks.

Gently fold egg whites into the rest of the batter.

Follow the instructions for your waffle iron to cook.  As for how much batter to use:  the instructions to our waffle iron indicated 2 different amounts, one for a thinner batter and one for a thicker batter.  I found that an amount right in the middle of these two yielded the best results.  I also found that setting the browning level just slightly above average worked best.

***

Spoon conserve over warm waffles.  Eat as is or add powdered sugar, bananas (shown above), ice cream, whipped cream or any combination of the above if you are feeling particularly decadent.

5.24.2011

Remoulade

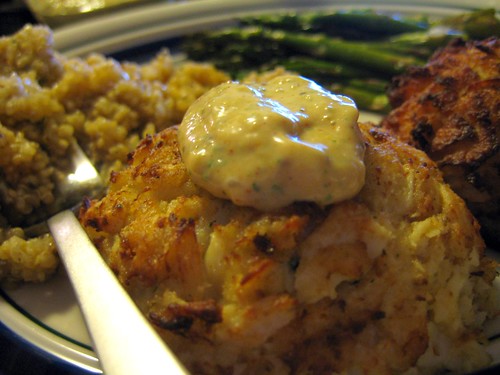
So, it turns out you dont have to make your own crabcakes to get some really good ones...

One of the greatest things about where we live is Fairway (i'm sure i've said it many times before, but its really true) and one of the hardest parts about one day leaving where we live will be the lack of Fairway...

and one of the best parts of fairway is their seafood counter...

Not only do they have great fresh seafood, they also have a lot of pre-cooked stuff...  We'd noticed the crab cakes one day and thought that we might try them one night when we were too lazy to make our own...

Generally, i'd top my crab cakes with cocktail sauce or tartar sauce, but a night when we were being to lazy to actually do anything more than heat our dinner up seemed like a good night to experiment with toppings - especially one that, while it has a long list of ingredients, requires VERY little actual work...

IMG_4490

I'm not sure if this qualifies as a traditional remoulade, but whatever it is, it definitely adds a little something that makes your supermarket prepared dinner seem just a little fancier...


Remoulade
courtesy of me

3/4 c light mayo
2 tsp dijon mustard
1.5 tsp whole-grain mustard
1.5 tsp ketchup
1 tsp red wine vinegar
1 tsp garlic cholulah (or other hot sauce of your choosing)
1 tbsp fresh flat-leaf parsley leaves (or 1 tsp dried)
1 scallion - most of the white and the light green parts
2 tbsp spanish onion
1/2 tbsp horseradish
2 tsp capers
1/2 tsp paprika
1/4 tsp chili powder
salt & pepper to taste

***

Place all ingredients in a mini-chopper (or blender or small food processor) and process until well combined and mostly smooth.

If possible, chill before serving to allow flavors to meld.

2.17.2011

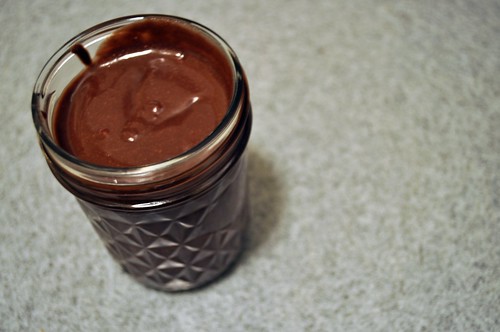
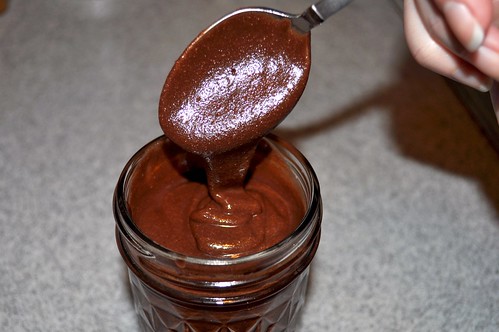
Homemade Nutella (Chocolate-Hazelnut Spread)

I needed a win.

I dont take well to failure (real or perceived) and its been a week or so of failure on some level.  And while i dont back down and hide, i do tend to try to turn things around.  When i used to do taxes, this amounted to walking into my boss' office and asking for the easiest return they had.  because when failure is all around me, i just want something that works.

This is the culinary equivalent of that easy tax return.

The internet has been buzzing about homemade nutella.  The LA Times published their recipe about two years ago but recently, it seems that everyone is all aflutter about it...  It seemed to hit a fever pitch somewhere around the holidays and then slowed a bit for some of January and then bam, right back just in time for World Nutella Day - a week and a half or so ago...

So when the universe seemed intent on telling me that i was a failure, i thought, what could be better than homemade nutella?  it appears easy enough and, hello, you get nutella in the end.  WIN-WIN.

When setting out to choose a recipe, i read a whole bunch.  some used cocoa powder, some melted chocolate.  some hazelnut oil, some vegetable oil, some no oil.  some milk, some powdered milk.  I poured through countless versions of this recipe until i came up with a game plan...  hazelnuts, cocoa powder, confectioners sugar, & vanilla.  Milk & vegetable oil on standby incase i needed them.

it was all going fine, too, right up until i was nearing the end...  i felt that i needed a bit more creaminess so i thought, ok self, lets go for a tablespoon of milk...and thats where the unraveling began...

the chocolate?  she seized.

if you've never experienced seized chocolate, well, its not pretty...  the chocolate gets grainy and unusable.  now, i'm still not totally sure why this happened as many bloggers before me had used milk without reporting adverse effects and the fats present from the liquified hazelnuts should have prevented the moisture from the milk (which also had fat in it!) from creating such a disaster, but there it was, in the food processor - a big mess.

but, again, i dont back down so easily so i was all 'its ok - thats what the vegetable oil is for!'

and then bad went to worse...

because while i did manage to make the mixture a bit smoother (though not as creamy & smooth as it should have been) my next taste was pretty much disgust.

my nutella tasted more like wesson oil than it did like anything else.

and thats when i finally gave up.  for that night, at least...

The next night, i was hell-bent determined to succeed.  So i stopped and picked up another $8.50 worth of hazelnuts and some powdered milk (ha!  i'll show that chocolate!) and while i was there, grabbed some hazelnut oil because i did not want Wessonutella again.  Hazelnut oil is not cheap, but have you heard the saying 'throw money at the problem'?  well, thats what i was doing.  I figured i could pay my way into success and frankly, I was ok with that...

DSC_0146

(It turns out that Jordan, being the husband extraordinare that he is - not to mention a fan of all things nutella, especially since our honeymoon in paris - also stopped at our beloved fairway for more hazelnuts and powdered milk...  he's good like that.  no, you cant have him...  and yes, that means we have more ingredients for MORE nutella!)

Thankfully, things went much, much better this time.  I'd managed to get my cocoa & sugar proportions sorted out the night before, so this time was a cinch...  of course, my blood pressure was most likely about 345/150 the whole time, waiting for something to go wrong, but FINALLY, FINALLY - SUCCESS.

DSC_0156

So next time you need a win?  This is your answer.


Homemade Nutella
courtesy of the LA Times, modifications by me


2 cups raw hazelnuts (if you can find pre-peeled ones, get them.  If not, i'll give you instructions on how to peel them below)

1/3 c cocoa powder
2/3 c powdered sugar
2 tbsp powdered milk

~1/2 tsp vanilla
~2 tbsp hazelnut oil


***

Preheat oven to 375°

Spread hazelnuts out on a baking sheet and place in oven to toast for ~ 8 minutes.  They will be fragrant and, if pre-peeled, 'shiny' when they are ready.

If your nuts are not pre-peeled:
Place warm nuts (be careful) in a clean dishtowel and rub, rub, rub.  The skins will rub off of the hazelnuts and into the towel.  You may find that you want to shake the towel out a few times and re-rub the hazelnuts.  You want to get as much skin off as you possibly can.

Once your nuts are peeled (or, right after they come out of the oven if they were pre-peeled) throw them into a food processor fitted with the basic, all purpose blade.

Pulse a few times until the nuts start to break down, then turn the processor on and let it whirl for about 5 - 6 minutes.  During that time, you will want to pause it and open it up and scrape down the sides, but you wont have to do this much after the first couple of minutes...

during those 5 - 6 minutes, your hazelnuts will first turn to a meal, then to a dust, then to a peanut butter-like substance, then will congeal and then, finally, into something that can only be described as really runny peanut butter consistency.

Once that has happened, add the cocoa powder, powdered sugar and powdered milk in and turn the food processor back on.  You'll end up letting it run another minute or so, but you will have to scrape it down at least once during that time as the cocoa and powdered sugar will have, inevitably, gone everywhere...

This is now the point where you have some decisions to make.  Taste the chocolaty-hazelnutty goodness and figure out how its working for you.  Some people will add a bit more sugar or a bit more cocoa.  some will think this consistency is good.  some will think they want it smoother or creamier...

At this point, i turned the food processor back on and used the little streaming hole to add first ~ 1/4 tsp of vanilla and ~ 1/2 tbsp of hazelnut oil.  then another 1/2 tbsp hazelnut oil.  then i tried it again and basically added those same ingredients - another 1/4 tsp vanilla and probably about another 1 tbsp of hazelnut oil until i got a taste and a consistency that worked for me.  note:  its going to thicken in the fridge, so at this point, you will want it to be a bit looser than you'll actually want the final product to be...


Once you've got something you like, find your best adorable mason jars (or other resealable, airtight container) and fill them up.  I found that i got about 2 small mason jars worth of nutella out of mine.

Use as you would regular nutella.


Notes from me & the internet: 

  • Homemade nutella is more expensive (by a lot) than jarred nutella.  This is much more for fun & for avoidance of weird ingredients than it is for saving $.
  • The internet claims this will last anywhere from a week to a month in your fridge.  I've only had it for a day, so i dont know.
  • The internet also tells me that i should let the nutella warm a bit before spreading.  good luck with that.
  • My brain tells me that, if i owned coconut extract, i would have used that instead of vanilla.  I've always thought nutella tasted vaguely coconutty and i think it would be good.
  • Just as i was writing that sentence, my brain thought that maybe a half-cup of macadamia nuts in place of one of the half-cups of hazelnuts would make this tropically delicious.
  • My brain also tells me that i think, if you were to leave out the powdered milk, you wouldnt need much oil.  In this case, you could save yourself $10 and just use wesson, cause you'd probably only use a tsp to a tbsp or so of it and it probably wouldnt affect the flavor much.

8.24.2010

Fake Shake Shack Sauce (sort of)

I'm a condiment whore.

Always have been. I just can't commit.

Back in my single days, my fridge had a few regular items in it: seltzer, beer, and loads of condiments. Ketchup, multiple types of mustards, a couple of mayos, etc. You get the idea.

But I'm also discriminating in my condiment usage. I don't slather ketchup all over everything; I try to keep it judicious, so I don't kill the taste in a pile of sugared-tomato.

While all this is going on, I'm living in the middle of a hamburger revolution, largely spurred by Shake Shack. The length of their lines are legendary. It took me until April 2009, nearly five years after they opened, to get there, mostly because I refused to wait on an hour-long line to get a burger and fries (or much of anything, for that matter). It was only when I found myself in their original Flatiron neighborhood 15 minutes before they were opening for the day (at 11am) and having not eaten breakfast that I finally acquiesced. And I was in love.

Not with the fries, though they are good. Nor with the burger itself, though it really is a very, very good burger. But with the Shack Sauce.

My opinion, whatever it's worth, is that the Shack Sauce is what all the fuss is really about.

So leave it to the guys at A Hamburger Today to get all deconstruct-y on it, both the meat itself and the sauce.

We tried the sauce here in our "test kitchen," and while we though it was great, and faithful to Shake Shack's actual sauce, we decided to make some changes based on our own personal preferences (specifically, lowering the amount of mayo, upping the paprika, and skipping the dill pickles).

And promptly used it all up atop our Baked Black Bean and Corn Burgers. We found that it balanced out the chili powder and cumin really nicely.

IMG_3907_2

So, without further ado...


Kitchen Hell's Modified Fake Shake Shack Sauce
courtesy of The Burger Lab @ A Hamburger Today with modifications by Jordan

1/3 cup mayo
1 tablespoon ketchup
1 tablespoon yellow mustard
1/4 teaspoon garlic powder
rounded/generous 1/4 teaspoon paprika
pinch ground cayenne pepper

***

Mix it all together.

Serve atop whatever you want: burgers (veggie or otherwise), hot dogs, dip your fries in it. Seriously, it's good with just about anything.
Related Posts Plugin for WordPress, Blogger...