Showing posts with label snack. Show all posts

9.02.2011

Strawberry-White Chocolate Snack Cakes

I meant to post these ages ago...  While what i thought were the last strawberries were kicking around the greenmarket...

However, during my last trip there, i noticed something strange - a lot of people still had strawberries...  strange but true.  Therefore, rather than save this for next summer, i'm sharing it now, at the end of this summer...
I suspect you could make these with any kind of berries, so while the it may be late in the season for strawberries, i'm still recommending you find a way to make these...  because summer's nearly over and big chunky sweaters are all the rage for fall (so say the fashion blogs) and whats better for hiding a few extra lbs than big chunky sweaters?

DSC_0497

So even if you think that you detest white chocolate, do yourself and those around you a favor and make these anyway.

Thank me later.


Strawberry-White Chocolate Snack Cakes
courtesy of Cake Keeper Cakes, via All that's left are the crumbs, with modifications by me

1 egg
1 egg yolk
1/2 cup sour cream
1/2 tsp grated lemon zest
2 tsp vanilla extract

1.5 c all purpose flour, divided
1.5 tsp baking powder
3/4 tsp baking soda
1/4 tsp salt

6 tbsp (3/4 stick) unsalted butter, softened
3/4 c sugar

8 oz strawberries, stemmed and sliced
3/4 c white chocolate chips

***

Heat the oven to 350°F.

Prepare a regular-sized muffin tin (i used cupcake liners...)

Combine the butter and sugar in a large mixing bowl and cream with an electric beater until fluffy. 

Combine the egg, egg yolk, sour cream, lemon zest and vanilla in a separate bowl

Combined 1.25 cups of flour, baking powder, baking soda and salt in a medium bowl.

With the mixer on medium-low speed, pour the egg mixture into the butter/sugar bowl in a slow stream and beat together until combined.

Then, turn the mixer down to low speed and add the flour mixture, a little at a time, mixing well after each addition. Once all of the flour has been added, mix for 30 seconds on medium.

Combine the strawberries and remaining 1/4 c flour in a bowl and toss to coat. Add white chips in and toss again.

Gently fold the berries and chocolate into the batter.

divide batter between 12 muffin cups.

bake until golden and a toothpick inserted in the center comes out clean, ~22 - 25 minutes. 

Allow to cool some before eating.

2.17.2011

Homemade Nutella (Chocolate-Hazelnut Spread)

I needed a win.

I dont take well to failure (real or perceived) and its been a week or so of failure on some level.  And while i dont back down and hide, i do tend to try to turn things around.  When i used to do taxes, this amounted to walking into my boss' office and asking for the easiest return they had.  because when failure is all around me, i just want something that works.

This is the culinary equivalent of that easy tax return.

The internet has been buzzing about homemade nutella.  The LA Times published their recipe about two years ago but recently, it seems that everyone is all aflutter about it...  It seemed to hit a fever pitch somewhere around the holidays and then slowed a bit for some of January and then bam, right back just in time for World Nutella Day - a week and a half or so ago...

So when the universe seemed intent on telling me that i was a failure, i thought, what could be better than homemade nutella?  it appears easy enough and, hello, you get nutella in the end.  WIN-WIN.

When setting out to choose a recipe, i read a whole bunch.  some used cocoa powder, some melted chocolate.  some hazelnut oil, some vegetable oil, some no oil.  some milk, some powdered milk.  I poured through countless versions of this recipe until i came up with a game plan...  hazelnuts, cocoa powder, confectioners sugar, & vanilla.  Milk & vegetable oil on standby incase i needed them.

it was all going fine, too, right up until i was nearing the end...  i felt that i needed a bit more creaminess so i thought, ok self, lets go for a tablespoon of milk...and thats where the unraveling began...

the chocolate?  she seized.

if you've never experienced seized chocolate, well, its not pretty...  the chocolate gets grainy and unusable.  now, i'm still not totally sure why this happened as many bloggers before me had used milk without reporting adverse effects and the fats present from the liquified hazelnuts should have prevented the moisture from the milk (which also had fat in it!) from creating such a disaster, but there it was, in the food processor - a big mess.

but, again, i dont back down so easily so i was all 'its ok - thats what the vegetable oil is for!'

and then bad went to worse...

because while i did manage to make the mixture a bit smoother (though not as creamy & smooth as it should have been) my next taste was pretty much disgust.

my nutella tasted more like wesson oil than it did like anything else.

and thats when i finally gave up.  for that night, at least...

The next night, i was hell-bent determined to succeed.  So i stopped and picked up another $8.50 worth of hazelnuts and some powdered milk (ha!  i'll show that chocolate!) and while i was there, grabbed some hazelnut oil because i did not want Wessonutella again.  Hazelnut oil is not cheap, but have you heard the saying 'throw money at the problem'?  well, thats what i was doing.  I figured i could pay my way into success and frankly, I was ok with that...

DSC_0146

(It turns out that Jordan, being the husband extraordinare that he is - not to mention a fan of all things nutella, especially since our honeymoon in paris - also stopped at our beloved fairway for more hazelnuts and powdered milk...  he's good like that.  no, you cant have him...  and yes, that means we have more ingredients for MORE nutella!)

Thankfully, things went much, much better this time.  I'd managed to get my cocoa & sugar proportions sorted out the night before, so this time was a cinch...  of course, my blood pressure was most likely about 345/150 the whole time, waiting for something to go wrong, but FINALLY, FINALLY - SUCCESS.

DSC_0156

So next time you need a win?  This is your answer.


Homemade Nutella
courtesy of the LA Times, modifications by me


2 cups raw hazelnuts (if you can find pre-peeled ones, get them.  If not, i'll give you instructions on how to peel them below)

1/3 c cocoa powder
2/3 c powdered sugar
2 tbsp powdered milk

~1/2 tsp vanilla
~2 tbsp hazelnut oil


***

Preheat oven to 375°

Spread hazelnuts out on a baking sheet and place in oven to toast for ~ 8 minutes.  They will be fragrant and, if pre-peeled, 'shiny' when they are ready.

If your nuts are not pre-peeled:
Place warm nuts (be careful) in a clean dishtowel and rub, rub, rub.  The skins will rub off of the hazelnuts and into the towel.  You may find that you want to shake the towel out a few times and re-rub the hazelnuts.  You want to get as much skin off as you possibly can.

Once your nuts are peeled (or, right after they come out of the oven if they were pre-peeled) throw them into a food processor fitted with the basic, all purpose blade.

Pulse a few times until the nuts start to break down, then turn the processor on and let it whirl for about 5 - 6 minutes.  During that time, you will want to pause it and open it up and scrape down the sides, but you wont have to do this much after the first couple of minutes...

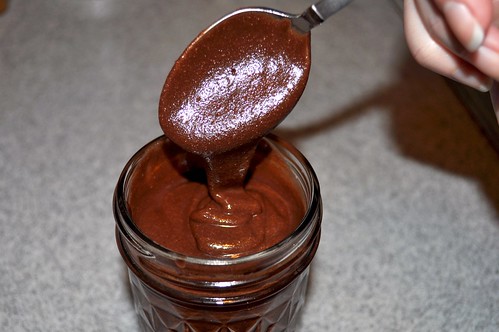
during those 5 - 6 minutes, your hazelnuts will first turn to a meal, then to a dust, then to a peanut butter-like substance, then will congeal and then, finally, into something that can only be described as really runny peanut butter consistency.

Once that has happened, add the cocoa powder, powdered sugar and powdered milk in and turn the food processor back on.  You'll end up letting it run another minute or so, but you will have to scrape it down at least once during that time as the cocoa and powdered sugar will have, inevitably, gone everywhere...

This is now the point where you have some decisions to make.  Taste the chocolaty-hazelnutty goodness and figure out how its working for you.  Some people will add a bit more sugar or a bit more cocoa.  some will think this consistency is good.  some will think they want it smoother or creamier...

At this point, i turned the food processor back on and used the little streaming hole to add first ~ 1/4 tsp of vanilla and ~ 1/2 tbsp of hazelnut oil.  then another 1/2 tbsp hazelnut oil.  then i tried it again and basically added those same ingredients - another 1/4 tsp vanilla and probably about another 1 tbsp of hazelnut oil until i got a taste and a consistency that worked for me.  note:  its going to thicken in the fridge, so at this point, you will want it to be a bit looser than you'll actually want the final product to be...


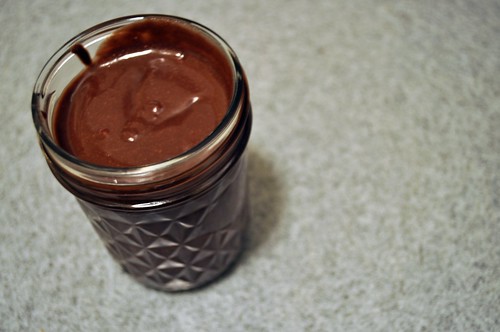
Once you've got something you like, find your best adorable mason jars (or other resealable, airtight container) and fill them up.  I found that i got about 2 small mason jars worth of nutella out of mine.

Use as you would regular nutella.


Notes from me & the internet: 

  • Homemade nutella is more expensive (by a lot) than jarred nutella.  This is much more for fun & for avoidance of weird ingredients than it is for saving $.
  • The internet claims this will last anywhere from a week to a month in your fridge.  I've only had it for a day, so i dont know.
  • The internet also tells me that i should let the nutella warm a bit before spreading.  good luck with that.
  • My brain tells me that, if i owned coconut extract, i would have used that instead of vanilla.  I've always thought nutella tasted vaguely coconutty and i think it would be good.
  • Just as i was writing that sentence, my brain thought that maybe a half-cup of macadamia nuts in place of one of the half-cups of hazelnuts would make this tropically delicious.
  • My brain also tells me that i think, if you were to leave out the powdered milk, you wouldnt need much oil.  In this case, you could save yourself $10 and just use wesson, cause you'd probably only use a tsp to a tbsp or so of it and it probably wouldnt affect the flavor much.

2.11.2011

Cowboy Caviar (aka Black Eyed Pea Salsa)

About 6 months ago, my friend E took me to a restaurant where she sometimes worked and sometimes just ate and drank... After hearing so many stories that involved this place, i finally said 'ok, i want to go too!' and so we did.

While there, we did many things, (not the least of which was drink lots and play with stupid iphone/ipod apps) but the thing that stood out the most was the Black Eyed Pea salsa & chips... When E insisted on ordering it, i was skeptical - i'd never eaten a black eyed pea and wasnt sure i wanted to start on that particular day... not to mention that, during this time, with wedding diet still in full mode, i wasnt sure i wanted to waste calories on salsa & chips...  but she insisted - we HAD to get this...

she wasnt wrong.  this was not plain old salsa and chips... (and we can probably blame a half-lb or so of unlost weight on this stuff...)

Luckily, due to E's connections to this particular restaurant, we could get a basic idea of how it was made... The first time i saw the recipe, i dismissed it as too complicated but when superbowl sunday rolled around last week, i emailed E and said - ok, i'm gonna try it...

(and no, before you asked, it was NOT an homage to the half-time show...  we banned that stupid 'band' from our wedding and i'd like to ban them from my life!!!)

DSC_0048

I dont know how close mine is to the original (given that i havent been there in more than 6 months) but i do know that its good. it definitely seemed to be a crowd-pleaser on super bowl sunday and bonus points? its better if you make it a day early, making it one of those fantastic recipes for entertaining as there is no scrambling around at the last minute while you are simultaneously trying to finish vacuuming, showering and also opening the door for the first few guests...


Cowboy Caviar (aka Black Eyed Pea Salsa)
courtesy of scribbled restaurant (unnamed to protect the innocent) notes as interpreted by me
Click here to import recipe directly into Pepperplate

NOTE:  this serves a LOT.  E's party had 32 people and we only went through 1/3 - 1/2 of the total recipe...

3 c black eyed peas

2 red peppers
2 green peppers
2 large red onions
~ 1/2 cup of cherry, grape or other small tomatoes (totally optional, mine were going to go bad if i didnt use them, so i threw them in...)

1/4 c minced garlic (i used the stuff from a jar for this particular recipe...  thats too much to mince!)
1 15-oz jar jalepenos, juice reserved and jalepenos roughly chopped

2 cans no-salt diced tomatoes, drained
1/2 bunch fresh parsley, roughly chopped (about 1/3 cup)

1 c cholula hot sauce (we used 1/3 chili lime and 2/3 original because its what we had...)
1 c worcestershire sauce (being a pescatarian, we used the regular kind but you can find veg worcestershire sauce if you are serving vegetarians)
2/3 c olive oil
2 tbsp dried oregano

salt & pepper to taste (start with 1 tbsp of each as mentioned below and go from there)

***

If using dried beans:
Soak 1 heaping cup of dried beans for about 6 -8 hours (do not oversoak!  i accidentally did and fermented my beans and had to start over...  oops.)
or
Place dried beans in pot, cover with water and bring to a boil.  boil for 3 - 4 minutes and then remove from heat.  Let stand in hot water for ~ 90 minutes.
Regardless of soaking method:
Once beans have been soaked, drain and cover again with fresh water.  Bring to a boil and boil ~ 15 minutes or until beans have softened, but are not mushy

If using canned beans:
Drain 2 cans of beans & set aside

After preparing beans of any kind:
Using your food processor fitted with the shredding disc, shred peppers, onions & cherry tomatoes (if using)
(yes you could do this by hand but oh my god thats a lot of chopping)
Drain excess liquid & put into a mixing bowl

Add in the garlic, the roughly chopped jalepenos (save the juice for later), the drained diced tomatoes & the chopped parsley and stir to combine.

If you still see a lot of excess liquid, drain it off again.

Add in black eyed peas & stir some more.

In a separate bowl, combine hot sauce, worcestershire sauce, olive oil, oregano & 1 tbsp each salt & pepper.  Whisk to combine fully.

Pour hot sauce mixture over the vegetable/pea mixture and stir a bit to combine.  Do not over-mix or you run the risk of smushing the black eyed peas...

refrigerate overnight and serve with sturdy tortilla chips (we used scoops and they worked well)

2.09.2011

Rosemary-Spiced Nuts

A number of years back, my friend Katie was having a few of us over for something - I cant remember if there was a reason or what, but I do remember that we were headed out to the burbs...  This was before my days of all things food, so when she announced that she was going to make us spiced nuts and other assorted appetizer-type foods, i was all 'who is this adult who has taken over katie's body???'

While i dont remember the details of the weekend, i distinctly remembered those nuts as they blew my mind...  something that never would have occurred to me - doctoring up a can of mixed nuts - was SO good!  its probably one of the moments i can pinpoint which led me to being the food-obsessed person i am now.  (the other would be the first time Roopa cooked me dinner way back when we were still crazy single party girls...)

Katie's original recipe came from a Nigella Lawson cookbook and was Nigella's take on the Union Square Cafe bar nuts.  Over the past 4 or 5 years, i've made rosemary-spiced nuts in varying ways - sometimes following Nigella, sometimes following any of the assorted other recipes you find when googling for spiced nuts or rosemary nuts.

DSC_0011

After years of making so many variations, this version will be the one i stick to as this was the first time i didnt feel that i was missing something or had used too much of something..  They have enough heat without being over-powering.  Enough rosemary without tasting like a bush. Enough sweet to satisfy my need for all things sweet.  and enough butter to hold it all together but not so much that they make your hands greasy...   


Rosemary-Spiced Nuts
courtesy of google searches everywhere, as adapted by me
Click here to import recipe directly into Pepperplate


~1 lb assorted mixed nuts, roasted but not salted (we used almonds, cashews, brazil nuts, pecans & hazelnuts, i think...)

2 tbsp unsalted butter
2 tbsp light brown sugar
1 tbsp white sugar
1.5 tbsp fresh rosemary, chopped finely - a mezzaluna works wonders for this (note:  dried rosemary will not work well in this recipe.  If you cannot find fresh rosemary, my parents have a big bush of it in their backyard.  They'll never notice if you steal some...)
1/2 tsp cayenne
2 tsp fleur de sel (or other sea salt)
1/3 tsp ground white pepper (i'm sure you could use black)

***

Preheat oven to 350°
Spread nuts on a baking sheet and toast ~ 7 minutes until just fragrant.  (do not turn off the oven yet and dont put the baking sheet in the sink yet either)

while nuts are toasting, mix the butter & all of the sugar & spice in a saucepan.  Heat all over medium heat, stirring, until the butter melts and all of the sugar & spice is well combined.

when nuts are done toasting, throw them in the sauce pan & mix to coat the nuts.  continue mixing and 'cooking' for about 3 minutes.

Remove nuts from heat and spread back on the baking sheet.  Put them back in the oven for 3 - 4 minutes to bake the butter into the nuts.

Serve warm or room temperature.
Related Posts Plugin for WordPress, Blogger...