Showing posts with label quick. Show all posts

2.27.2012

Sunday Morning Bagels

Long time, no post...

Its been a whirlwind, to say the least...  but it looks like Kitchen Hell will be moving up in the world!  No, not the blog-world, but the real world...  Let's just say that teeny tiny kitchen?  We'll be upgrading.  and the 2nd biggest greenmarket in NYC?  Right outside of our front door.  Cooking won't be the hell that it is today and we can't wait...

As a result of the impending move (to an apartment we chose 50% based on its kitchen alone), we've been hard-pressed to do much of anything in our current tiny, cramped, half-sized-appliance kitchen and as a result, there's been a lot of eating out, ordering in, frozen dinners and pasta (boxed) with red sauce (from a jar)...

Quite frankly, frozen Amy's dinners, while yummy in their own right, don't make for the best blog fodder...

Our weekend morning rituals haven't been much better than the dinners - pretty dependent on our local diner and bagel shop and when you can be served really good, still-warm-from-the-oven bagels by walking about  2 blocks from home (and barely beyond the store where you would have to fight your way through the crowds to buy anything to make at home) it's really hard to motivate to do anything different...

However, this past week, someone posted a bagel sandwich that looked so good that it was just the motivation I needed...  I needed that bagel sandwich...

IMAG1287

This isn't earth shattering, it's not life changing, so why am I posting it?  Because, frankly, it was so good that we've already talked about how we should really be sure to keep these ingredients in the house from now on...  Even when cooking isn't the hell it is today.

With this one, the tiny smidgen of motivation it took paid dividends...


Sunday Morning Bagels

2 everything bagels

~1/2 c whipped cream cheese
1/2 of a ripe avocado, sliced
a few paper-thin slices of red onion

lemon pepper

***
Slice bagels in half

Spread half of the cream cheese onto each bagel - covering both sides of the bagel (i like a lot of cream cheese, 1/2 c might be more than most people need...)

put half of your avocado slices onto one side of each bagel

sprinkle a few slices of the red onion over the avocado (this is optional - Jordan doesnt like raw onion, so he skipped this...)

Sprinkle the avocado and onion with a generous shake of lemon pepper

Close bagels up, slice in half and enjoy

1.06.2012

Dutch Baby Pancake

I'd never heard of a dutch baby pancake before...

But just as I was starting to think about New Year's Day breakfast, Martha, bless her heart, sent me this recipe and it sounded like the perfect way to start off the new year...


DSC_0815

And it turns out it was.


Dutch Baby Pancake
courtesy of Martha Stewart

NOTE: I'm providing the recipe as we followed it, but next time I make this, I'll probably cut the lemon juice by 25%. It was good, don't get me wrong, but just a little too much lemon for our personal tastes.  Also, Martha claims this serves 4.  I say, 4 children, maybe, but for adults?  2 of us had no problem finishing this whatsoever...

3 tbsp butter, divided

3 eggs
3/4 c whole milk
1/2 c all-purpose flour
1/4 tsp salt
1/2 tsp vanilla extract
1/4 c plus 1 tbsp sugar, divided

1 tbsp fresh lemon juice

***

Preheat oven to 425°.

In an oven-safe, medium-sized skillet, melt 2 tbsp butter over medium heat and then set aside.

In a blender, combine eggs, milk, flour, salt, vanilla, and 1/4 c sugar. Blend until foamy, 30 seconds to 1 minute, depending on the power of your blender.

Pour batter into skillet and place skillet in the oven.

Bake ~ 20 minutes or until pancake is puffed and lightly browned.

While baking, cut the remaining tbsp of butter into small bits.

Once the pancake is cooked, remove from oven and dot with the butter bits.

Sprinkle with remaining tbsp of sugar and lemon juice.

Slice into wedges and serve immediately.

7.15.2011

Crispy Black Bean Tacos

I swear, i was born in the wrong country...  i think canadians are far more interesting than americans and all i eat is mexican food...

maybe its good that i was born half-way in between the two?

Regardless, its summer and for me, summer means a lot of things...  but for purposes of this blog?  it means mexican food.  it means how many different ways can i make tacos...

I saw this recipe posted over on tumblr (its like twitter, but bigger...)  and thought it looked interesting, and then someone else i follow on tumblr went ahead and made it like, 4 hours later...  and a girl can only take so much peer pressure before she gives in, you know...

IMG_4624

We served it with some kicked up rice and some cold beer.  i recommend you do the same...


Crispy Black Bean Tacos
courtesy of Bon Appetit with modifications by me

1 15-ounce can reduced sodium black beans, drained & rinsed
1/2 tsp ground cumin

2 tsp olive oil
juice from one lime
1/2 serrano pepper, minced
2 c coleslaw mix (no dressing, just the cabbage/carrots/etc.  You can buy it bagged...)
2 green onions, very bottom and dark green portions discarded, center sliced into small discs
1/3 c chopped fresh cilantro
1/2 avocado, diced
salt & pepper (to taste)

1 tbsp olive oil
6 corn tortillas

1/3 cup crumbled cotija cheese

hot sauce of your choice (chipotle works quite well)

***

In a small bowl, mash beans and cumin until beans are mostly mashed but still have some definable beans

In a medium bowl, mix 2 tsp olive oil, lime juice and serrano pepper together.  Then add coleslaw mix, green onion, cilantro and avocado and toss to coat.  Salt & pepper to taste.

Heat 1 tbsp olive oil on a large skillet over medium-high heat.
Fit as many tortillas as you can on.  Spoon approximately 1/6 of the bean mixture onto each, keeping it to one side and not too close to the edges.  (it won't seem like enough, but this allows for more room for the slaw & cheese...) Allow to cook for a minute.  

While they are still on the skillet, carefully fold tortillas in half.  Do not press down too hard, but make sure they are folded enough to stay folded.  Allow to cook on each side for a minute or two, until golden brown.

Remove from skillet and place on a paper towel to soak up any excess oil.

Top each with a generous amount of slaw and cotija - more than you see in the picture - after taking a few bites we realized we'd been skimpy on both - and top with hot sauce before serving...

4.01.2011

Avocado-Pistachio Wrap

This time of year, things get a little hectic...  its stupid, really...  I gave up my busy Jan-April job a couple of years ago, so this should be my slow time.  However, that rational thinking has caused me to overextend myself in so many ways that Jan-April is nearly as bad as it used to be.

before someone throws something at me, i did say NEARLY...

Anyway, (tangent - google tells me i use the word AGO more than any other word on this blog.  I'm completely and 100% shocked that its not ANYWAY...) busy nights lead to quick dinners thrown together...  After the quesedillias, there were a few random things kicking around and i'm still trying really hard to cut down on my food waste, so i was all 'what can i make with that bit of goat cheese and those tortillas?' and i thought back to the little card that was floating around in my bottomless pit bag from my local Pret...  It had instructions on how to construct their avocado-pine nut wrap and it was enough to get me started on my own avocado wrap.

DSC_0287

Dont tell them, but i might like my version better...


Avocado-Pistachio Wrap
Inspired by Pret A Manger, courtesy of me

2 tbsp plain yogurt
2 tbsp low-fat mayo

2 whole grain tortillas

1 avocado, cut into slices
1/4 - 1/3 c goat cheese crumbles
1 c arugula
15 - 20 pistachios, shelled & chopped (yes, we have a slap chop.  2 in fact.  we > you)

salt & pepper

***

mix the yogurt & mayo together and set aside

lay out the tortillas

place 1/2 of the avocado, then 1/2 of the goat cheese, then 1/2 of the arugula & you guessed it, 1/2 of the pistachios in each, mostly towards the center and one end...  kind of like from the center of the clock down to 6 o'clock, if that makes sense...

salt & pepper to suit your personal tastes
(the average person enjoys 3 cranks of a pepper grinder.  true story.  learned it from a real-live bonafied professional chef)


Carefully fold both sides in and roll from the bottom*.  Slice in half** and enjoy.

* If you are as talented as me, your sides wont stay rolled so tight, but i assure you, your wrap will taste just as good, regardless...
**slicing on an angle makes the first bite easier to take...  

3.04.2011

Quick & Easy Personalized Pizza

Lately, for some reason, dinner stresses me out.  I dont know if its the whole 'getting married and being someone's wife' thing or if its just the 'not on a diet anymore (though i should be) so there's no excuse for less than amazing-tasting food' thing or if its the 'i want more to post on the blog' thing or my competitive nature which makes me want to outdo myself every time, but every time Jordan asks if i have any idea what i want for dinner, i get immediately stressed...

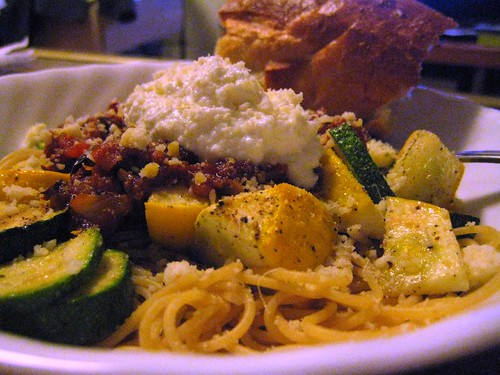
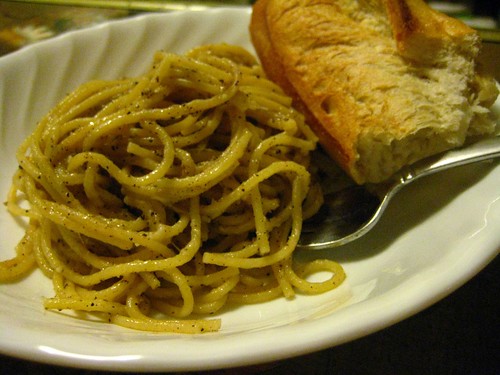
The other morning, on the way to work, we were talking about this and were talking about how a rotation of themes would help...  for example, nearly every sunday, we have some sort of pasta.  I grew up that way and Jordan is more than happy to play along and that makes sunday night dinner the least stressful one of the whole week - because at least there is always a starting point...

So we started brainstorming themes - things that, like pasta, could be as easy or as complex as you allow them to be.  and we came up with pizza...  We've been on a pizza kick for months now, after discovering this awesome little place - Bodrum - not too far from our apartment that does flatbread pizzas.  In the summer they have a great little outdoor area and in the winter, the fiery pizza oven makes it super-cozy inside...  Its become our go-to when we want grown-up pizza (there's wine, you see...)

But i digress - i was talking pizza at home...  so, anyway...  after a few seconds of though, we realized that pizza can be incredibly easy if you choose to buy all pre-made parts and just assemble them or can be more complicated if you choose to make your own pizza dough & sauce or have to pre-cook any of your toppings.  Therefore, i'm calling it -

Pizza is the new Pasta!

(dont worry sunday nights, you'll always be pasta night...)

In addition to it being wherever you want on the difficulty meter, another great things about pizza night is everyone can have whatever they want.  As long as you can agree on a crust, you are golden!  This is imperative when you have people with differing tastes - vegetarian, meat-eating, pepper-adverse, whatever...

DSC_0229

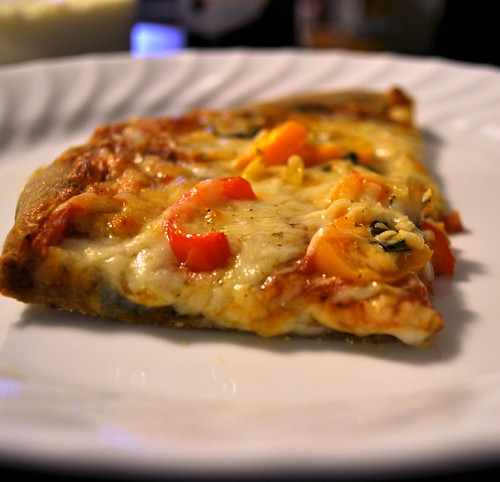
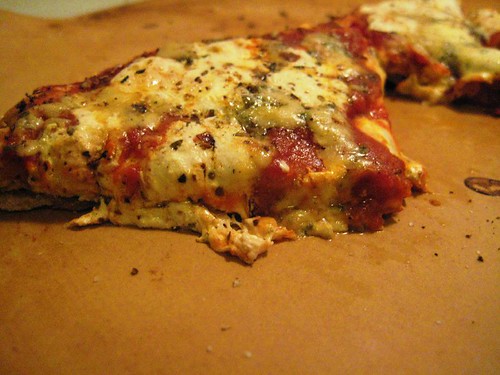
This particular take on pizza was fairly simple - store bought crust (TJs wheat crust - 99cents! woo!  though, i highly recommend stopping by your local pizzeria and asking to buy dough - did you know they sell it?  i never did until i read it on someone else's blog a while back), doctored up store-bought sauce and we stayed fairly basic with our cheeses & other toppings.  However, now that we've declared pizza as a new theme, you can be assured we'll be experimenting.  and, of course, since half of my stress is 'blog fodder' - sharing it here with you.


Quick & Easy Personalized Pizza
courtesy of me

Special tools used:  Pizza stone, pizza peel.  If you dont have these, just use baking sheets - one in the oven pre-heating and the back of another one for assembling the pizza

1/4 c cornmeal
1 trader joe's whole wheat pizza crust (feel free to buy one from a store or your pizzeria or make your own instead)

~ 1/2 jar trader joe's pizza sauce
1 tbsp garlic, minced
2 tbsp basil, chiffonaded (is that a word?  spell check wants to call it chickenfeed!  ha!)

~1 c shredded mozzarella
~1 c shredded asiago

1/4 of an onion, sliced thinly & layers separated into individual pieces
3 small sweet peppers, sliced (think slightly larger than jalepenos)
1 medium tomato, sliced & slices cut in half

crushed red pepper (optional)
oregano

***

Remove pizza dough from fridge and allow to come to room temperature (in its bag)
Place pizza stone in oven on middle rack and preheat to 450°

turn pizza dough out onto lightly floured surface to suck up any lingering stickiness

once dough is no longer wet, start shaping it into a circle.  Try to imitate the local pizza dudes and use your fists to turn & stretch it out until it is about 10" around.

spread a fairly generous amount of cornmeal onto your pizza peel (this is IMPORTANT) and place stretched dough on top of it.  Continue to stretch and shape until its about 12" diameter.  Dont worry if its not a perfect circle - mine tend to end up oblong -as long as its fairly consistent in thickness (with a little extra thickness at the edge) and fits on your stone, its all good.

mix 1/2 of a jar of TJs pizza sauce with the minced garlic & 1 tbsp of the basil

spread that mix evenly over the pizza, leaving about 1/2" - 1" around all edges

sprinkle half of the asiago and half of the mozzarella over the sauce

Now for the customization - here's how we made ours:
onion pieces on entire pizza
pepper slices on half of pizza
tomato slices on the other half of pizza
crushed red pepper on the side with tomato slices (warning - it will bake in and get REALLY hot.  be very sparing...) 
Back to the whole pizza:
To finish it off, sprinkle remaining basil over toppings, sprinkle remaining cheese over that and sprinkle oregano over the whole thing.

Slide off of pizza peel (this is why the cornmeal is SO important - thats what allows it to slide) onto the hot pizza stone and cook ~ 7 - 8 minutes.

Allow to cool for 3-4 minutes prior to serving to allow cheese to 'set'

2.09.2011

Rosemary-Spiced Nuts

A number of years back, my friend Katie was having a few of us over for something - I cant remember if there was a reason or what, but I do remember that we were headed out to the burbs...  This was before my days of all things food, so when she announced that she was going to make us spiced nuts and other assorted appetizer-type foods, i was all 'who is this adult who has taken over katie's body???'

While i dont remember the details of the weekend, i distinctly remembered those nuts as they blew my mind...  something that never would have occurred to me - doctoring up a can of mixed nuts - was SO good!  its probably one of the moments i can pinpoint which led me to being the food-obsessed person i am now.  (the other would be the first time Roopa cooked me dinner way back when we were still crazy single party girls...)

Katie's original recipe came from a Nigella Lawson cookbook and was Nigella's take on the Union Square Cafe bar nuts.  Over the past 4 or 5 years, i've made rosemary-spiced nuts in varying ways - sometimes following Nigella, sometimes following any of the assorted other recipes you find when googling for spiced nuts or rosemary nuts.

DSC_0011

After years of making so many variations, this version will be the one i stick to as this was the first time i didnt feel that i was missing something or had used too much of something..  They have enough heat without being over-powering.  Enough rosemary without tasting like a bush. Enough sweet to satisfy my need for all things sweet.  and enough butter to hold it all together but not so much that they make your hands greasy...   


Rosemary-Spiced Nuts
courtesy of google searches everywhere, as adapted by me
Click here to import recipe directly into Pepperplate


~1 lb assorted mixed nuts, roasted but not salted (we used almonds, cashews, brazil nuts, pecans & hazelnuts, i think...)

2 tbsp unsalted butter
2 tbsp light brown sugar
1 tbsp white sugar
1.5 tbsp fresh rosemary, chopped finely - a mezzaluna works wonders for this (note:  dried rosemary will not work well in this recipe.  If you cannot find fresh rosemary, my parents have a big bush of it in their backyard.  They'll never notice if you steal some...)
1/2 tsp cayenne
2 tsp fleur de sel (or other sea salt)
1/3 tsp ground white pepper (i'm sure you could use black)

***

Preheat oven to 350°
Spread nuts on a baking sheet and toast ~ 7 minutes until just fragrant.  (do not turn off the oven yet and dont put the baking sheet in the sink yet either)

while nuts are toasting, mix the butter & all of the sugar & spice in a saucepan.  Heat all over medium heat, stirring, until the butter melts and all of the sugar & spice is well combined.

when nuts are done toasting, throw them in the sauce pan & mix to coat the nuts.  continue mixing and 'cooking' for about 3 minutes.

Remove nuts from heat and spread back on the baking sheet.  Put them back in the oven for 3 - 4 minutes to bake the butter into the nuts.

Serve warm or room temperature.

8.16.2010

Roasted Corn, Tomato & Garlic Pasta

As we reach the 2 months-to-the-wedding mark, the meat-eater and i are increasingly on the lookout for quick, healthy dinners.  With an abundance of CSA produce in our teeny-tiny fridge (i bet people who dont live in NYC didnt know that fridges come in 2/3 and 3/4 sizes...  they do and it SUCKS) we're always looking for ways to use that rather than run out to Fairway.  (dont get me wrong, i love fairway.  but its patrons?  not so much...)

When i saw a post on markbittman.com for Pasta with Grilled Corn & Roasted Garlic, i thought to myself - 'ok, fine, more pasta...  but hey, we're getting corn from csa this week...'  (in case you couldnt tell, i've wholly embraced pasta-as-a-vehicle-for-veggies this year...)  and this looks different - we've had the spicy tomato squash pasta about 5854 weeks in a row and as good as it is, i needed a break...

In the past, the corn from our CSA hasnt been their best output...  i'd always blamed it on the fact that i grew up on jersey corn (probably the only thing we ever got from farm stands when i was a kid) and there just was no way that the upstate stuff could compete...  That meant that using the corn as a secondary ingredient was generally a decent way to go...

however, this year proved different...  we had 3 ears of corn this week so friday night, we busted one open to use in fish tacos (our official beach meal) and realized that it was some seriously excellent corn...  which made me even more excited for the roasted corn pasta...  which was good, because the meat-eater needed a bit of convincing...

We made a couple of slight changes - added some roasted tomatoes (as we feared they wouldnt last much longer in our overly-warm apartment) and cut a bit of the butter down (wedding dress diets and all...) and ended up with something awesome... This wasnt a savory pasta - the sweetness of the corn and the roasted garlic were fairly awesome with the butter & oil and the parsley - as a general rule, i dont even like parsley but it totally finished this dish off perfectly...

IMG_3900

Can you believe we ever doubted Mark Bittman???


Roasted Corn, Tomato & Garlic Pasta
courtesy of markbittman.com with adaptations by me

2 ears corn, husks and silks removed, washed
5 garlic cloves, skins on
4 small tomatoes, seeds and gel removed, cut into pieces
1 generous tablespoon sweet butter, divided
2 tablespoons olive oil, divided
1/2 box (or pound) pasta
1 cup pasta water
1/2 cup Italian parsley, leaves only, washed, finely chopped
Sea salt and black pepper to taste
Freshly grated Parmesan or Romano cheese

***

Preheat the oven to 350°
Place the ears of corn, garlic cloves & chopped tomatoes on a baking sheet or roasting pan.  Keep separated, as they will all be incorporated into the final dish differently.  Drizzle 1 tablespoon of olive oil over the entire pan to coat. Season with sea salt and pepper. 
Oven roast about 20 minutes. Set aside to cool. 
Remove the corn kernels from the cobs and discard the cobs.
Cut off the garlic skins & discard the skins.  Roughly chop the roasted garlic and set aside.

Prepare pasta in accordance with directions for al dente pasta. 
When draining, reserve 1 cup of the pasta water. 
Return the pasta to the still hot pot. 
Drizzle with a bit of olive oil, add 1/2 tablespoon sweet butter, season with sea salt and black pepper, stir well, and cover

In a large pan over medium heat,  melt together the remaining 1/2 tbsp of sweet butter with 1 tablespoon olive oil.  Add the roasted garlic to the butter-olive oil mixture. Add 1/2 cup pasta water. Stir well to combine. Simmer 5 minutes, stirring occasionally..

Add the corn kernels to the garlic, butter & oil.  Stir to combine.
Add the cooked pasta to the sauce. Toss to coat. 
Incorporate the roasted tomatoes & parsley.  Add the remaining pasta water if you want a thinner sauce. 

Serve with freshly grated Parmesan or Romano cheese and a crusty baguette.

8.06.2010

Tuna Pasta Salad

One night last week, we were at a loss.  No really money to go out, no desire to cook...  Neither of us could decide what we wanted to eat so we sat there, fridge & cupboard open, rattling off everything we saw...

At some point, i turned to the meat eater and said 'tuna pasta salad?' and he was all like, 'ok, whats in it?' and when i mentioned mayo, his response was, 'um, EW?'

and then i realized that tuna pasta salad - one of my favorite things - must be another one of those single behaviours that i didnt even know was strange...

to me, its perfectly logical...  tuna salad = good.  pasta salad = good.  tuna pasta salad = good!

he couldnt think of anything better, so tuna pasta salad it was.  ha!  forget food pictures, i should have taken a video of his expressions as i was putting it all together...  'wait, you're putting MUSTARD in it?'  'um, what else do we have in the house if this is gross?'  'maybe i should just order something now?'

That first night (oh, because, spoiler alert:  we made it twice last week) i made it two ways... His with tomatos and parmesan and mine with celery and feta.  I tried both and realized that the feta - not so much...  it was fine, but not particularly interesting...  kinda just tuna salad with feta and pasta - not so much anything that made it seem cohesive at all...

but the tomatoes & parmesan - now we were talking....

IMG_3818

I'll have you all know, the reason we had it twice?  oh, cause the skeptical meat-eater? he requested it the second time...


Tuna Pasta Salad
courtesy of me
Click here to import recipe directly into Pepperplate

5 oz pasta of your choice (we made campanelle once and orecchiette the second time.  Shells work too.)

2 5oz cans solid white albacore tuna in water, drained
1/4 c light mayo
1 - 2 tsp spicy brown mustard
salt
pepper
garlic powder
onion powder

1 14.5 oz can zesty diced tomatoes, drained
1/4 c grated parmesan

***

Prepare pasta according to directions on pacakge.  cool under cold water to stop cooking & cool pasta down.  Set aside

Prepare tuna salad - combine tuna, light mayo and spicy brown mustard first.  then add salt, pepper, garlic powder and onion powder to taste.  (I like a decent amount of each - a few shakes -  but i always start slow and build up because nothing ruins this faster than too much garlic or onion powder...)

Once tuna salad is to your liking (it will most likely be a bit dryer than you usually would eat it), add in the tomatoes & parmesan.

Once all is combined, check the taste again and adjust accordingly.  You may find that you still want a bit more mayo or maybe a bit more spice.  I generally add a bit more onion and pepper at this point but it all depends on how heavy handed i was to begin with...

7.26.2010

Linguine, roasted squash & spicy garlic tomatoes

This summer i've been all about the thin pastas...  historically, i really couldnt stand spaghetti, linguine, vermicelli or anything else like it.  Angel hair had its place cause it was so quick, but aside from that, i was all about the shapes.

for some reason, this summer, all i want is the long, thin stuff...

After a weekend at the beach (a weekend in which i failed to repair tan lines and instead just shifted to new ones...) and a long ride home, we were tempted to order in, but i was thinking of the 3lbs of squash sitting in the crisper and it just seemed silly to not use it...  and since sunday is pasta night in this jewish-italian household, the squash & pasta fallback was a natural fit.

In addition to the thin spaghettis, we've also been all about oil & butter-based sauces instead of traditional red sauces this summer - another natural fit for the squash, as i see no need to drown the taste in a ton of traditional red sauce.

IMG_3812

This meal was about 10-15 minutes hands on - exactly what we needed on a hot, lazy sunday night.


Linguine, Roasted Squash & Spicy Garlic Tomatoes
courtesy of me & the meat-eater
Click here to import directly into Pepperplate

~1lb assorted squash (we used zucchini & patty pan)
1 tbsp olive oil
salt
garlic powder
black pepper

1/3 box thin pasta of your choice

3/4 tbsp olive oil
3/4 tbsp butter
3-4 cloves of garlic
1/2 can of zesty diced tomatoes
pinch of crushed red pepper flakes

ricotta (optional)
parmesan (optional)

***

Preheat oven to 375

Cut squash into bite size pieces.  Place on cookie sheet & toss with a bit of olive oil, salt, garlic powder & a generous amount of black pepper.

Roast for ~20 minutes, tossing again once.

Just after the squash goes into the oven, begin the water boiling for the pasta.
Cook pasta al dente, according to directions on box.

Just as you throw the pasta in to cook, put olive oil & butter in a pan over medium heat.  While its heating, chop the garlic into small pieces.

Once butter is melted, throw garlic into the pan & cook until a bit browned.
Lower the heat slightly and stir in tomatoes.
Simmer for about 5 minutes or until most of the liquid has cooked down, but just before you turn it off, shake in a little bit of crushed red pepper, mix it around and then turn it off.

Just as the sauce is finishing, the squash should be roasted and the pasta should be drained and waiting.

Plate pasta, put squash over top of pasta and top with tomatoes.

Add a spoonful of ricotta, a sprinkling of parmesan, a hunk of crusty baguette & a glass of white wine and you've got yourself a sunday night :)

(serves 2)

7.20.2010

Tuna Salad Lettuce Wraps

my poor grandma J... she HATED to cook.

If she's reading this, she's rolling her eyes at me and wondering why in the world i would post any of her recipes...

but thats the funny thing about Grandma J - she hated to cook but she always did a pretty good job of it... which was a good thing, because she had this theory - if she bothered to cook it, you better bother to eat it.

Also as a result of her hatred of all things cooking, she was a devout recipe-follower... she didnt want to think, didnt want to experiment - just wanted to spend as little time and thought as possible on getting food that people would eat onto the table.

I was never reminded of this so much as i was when we would spend a week at the beach with her... we'd get these little bungalows and spend our days on the beach & evenings in the arcade. Nowadays, vacations (for me) include eating as a big part of them. But back then, eating was an afterthough... but it apparently made an impression none-the-less...

You see, a few weeks ago, the meat eater and i had good fortune combine and there was an available weekend coupled with an available beachfront condo... the only thing we didnt have was an actual fortune, so we accepted the condo and figured we'd cook all weekend...

i immediately wanted tuna with celery & lettuce on toasted wheat bread for lunch.

because thats what we always ate for lunch at the beach.

My typical tuna needs are much easier - no celery chopping, no lettuce garnish - hell, half of the time there isnt even bread... but the beach calls for something much more specific.

Since we've returned from the beach, i've held onto my need to have celery in my tuna salad (something which makes the meat eater gag - good thing he wasnt around grandma - she would have made him eat it!!!) and last week, combined my version of the beach tuna salad with lettuce leaves as wraps. because good god have we gotten a lot of lettuce from the CSA and really, there are only SO MANY dinner salads a girl can have...

IMG_3779

see what i did there?
More CSA usage, FTW!


Tuna Salad in Lettuce Wraps
Inspired by Grandma J

1 can albacore tuna in water, drained
2 tbsp light mayo
1 tsp spicy brown mustard
1 celery rib, diced
salt, pepper, garlic powder, onion powder (to taste)

6 large leaves red or green romaine lettuce

***

Combine first 4 ingredients
Taste and then season with more mayo, more mustard, salt, pepper, garlic and/or onion poweder, to taste (i generally do a shake of each one)

divide tuna between lettuce leaves and roll up

Pat yourself on the back for using CSA ingredients in non-obvious way.

4.30.2010

2 point microwave cake for one

(formerly titled 'SSB for two*')

I seriously hate hate hate to quote sex and the city - so cliche! - yet sometimes, its the only way to express my thoughts on something...  but this truly is one of those things that should probably fall into the category of Secret Single Behaviour...

(this could also be called 'science experiment' or 'myth busters' or whatever other terms one could use for testing something found on the internet that seems too good to be true...)

somewhere along the way, i stumbled upon this recipe for '2 pt cake for 1'...  (the internet tells me its originally from http://www.skinnytaste.com/, but i cannot find it on that site, so i'm not sure...)
first we see the tell-tale points in the title meaning we're dealing with weight watchers (i'm a lifetime failure member, so know these things immediately...) which, um, the reason i left WW?  to eat real food instead of packaged chemicals and to avoid things like splenda being in everything i ate...  so i'm already skeptical.

then i read said recipe.  and now i'm REALLY skeptical...  i figure that, at best, this is going to fall somewhere between easy-bake oven cake and that crappy experiment that was microwave cake a number of years back.  neither of which is promising.

however, thats why i'm here and why i'm blogging - to tell you that this far exceeded my expectations.  that this actually isnt half bad!  i had the recipe sitting on our table long enough to intrigue the meat eater enough that he went out and purchased the ingredients so that we could try it sooner rather than later...

IMG_3577a

i know enough WW-math to know that 2 points of something like this cake is somewhere in the vicinity of 100 calories which is something that even I can fit into my diet most days...  and on a good day, it even leaves a bit of wiggle room to add a tablespoon of cream cheese frosting to it...

our low expectations caused us to only make one serving of it (making this '2 pt cake for 2') but we didnt end up throwing away the rest of the mix as i had guessed that we might (which would have made this a $6.00 shitty cupcake) but i'd love to figure out how long to microwave two of them at one time, cause i can assure you this will be made again.

*this isnt a relationship blog, but you have to admit, the best ones are when you get to share your secret single behaviours, dont you think?


2 point microwave cake for one
courtesy of the internet, possibly originating from skinnytable.com

For the mix:
1 box red velvet (or any other flavor) cake mix
1 box angel food cake

***

Combine thoroughly in a ziplock bag or other seal-able container


To make the cake:
1/4 cup of the mix (above)
2 tbsp water
frosting (optional - this adds another point or two, if you are counting)

***

Combine mix and water into a microwave safe mug (one of the ones that are glazed inside work best)
Stir until well combined to avoid cake-mix lumps
Microwave 1 minute on high.
Gently run a butterknife around the edges of the cake to loosen it from the sides then invert mug over to release cake onto a plate

Add a tablespoon of cream cheese (or other) frosting, if desired (the meat eater prefers it plain)

11.02.2009

Cacio e Pepe

(formerly titled "making up for past transgressions")

a while back, while perusing tumblr, i came across a recipe; basically pasta with pepper but if you want it to sound fancy, call it Cacio e Pepe.

it sounded different, cheesy and easy so we decided to make it one night..  However, being rule-breakers, we basically did everything that the original recipe said not to do - we didnt buy superfresh black pepper - we just used the little 4 pepper grinder that was up in the cabinet.  we didnt use two kinds of cheese - we used whatever it was that we had in the fridge...  and that month or two ago?  it was ok but WAY too hot (um, thats why the recipe didnt call for 4-color pepper, i suppose?).  and not good enough to be worth it.  i dont think i even finished mine.  and dude, i like to eat, so thats saying something.

i never criticized though - didnt post it as a recipe-gone-wrong - because really, i hate those people on recipezaar who are like "this recipe SUCKS - i made 435 substitutions of the ingredients and it didnt cook right and tasted NOTHING like cheesecake!"

however, even though it may have been our fault the first time, you can understand why i was a bit skeptical to try again...  but we agreed to follow the recipe as written this time and - ooh boy - its amazing how different something comes out when you actually FOLLOW the recipe...   made the right way with the right ingredients - this one is a winner.

someone should remind the recipezaar folks of that...

IMG_3214


Cacio e Pepe
courtesy of We Are Never Full - barely any modifications by me
Click here to import recipe directly into Pepperplate

3/4 pound of spaghetti
2 tablespoons unsalted butter
2 tablespoons extra virgin olive oil
1.5 tablespoons freshly ground pepper 
a bit of the pasta cooking liquid (about 1/4 cup)
1/2 cup of freshly ground pecorino romano
1/2 cup freshly ground parmigiano reggiano

***

Prepare spagetti according to directions on package.  Reserve some of the liquid (about 1/4 cup)

When pasta only has a few minutes left, begin preparing the sauce.

In a separate pan, on low-medium heat, add your butter, oil and 3/4 tbps pepper.
Allow the butter to melt, swirling the pan around to help it move a bit.

When spaghetti is done, add the reserved cooking liquid to your melted butter/pepper/olive oil sauce and swirl the pot again.

Turn heat down to low. Add your spaghetti and toss once.
Add your cheeses and the rest of the pepper (3/4 tbsp) and toss the spaghetti again in the pan to combine all ingredients.

Top with a sprinkle more of pepper and cheese, if desired.
Serve with warm baguette and wine, of course

8.18.2008

cheat-a-pizza

i've had bloggers block... sorry...

and this isnt exactly rocket science that i'm about to post but when bloggers block hits, there's little one can do but ride it out... (if you must know, i chose to ride it out over some white water while sitting in a tube up in the catskills. a few bruises later, hopefully i've shaken out some of the cobwebs...)

anyway, back to cheat-a-pizza...

so i'm on the phone one night chatting with my friend Sherri while making myself some of the ever-impressive pita pizza that college girls everywhere call gourmet dinner and i mentioned it... she mis-heard and thought i said cheat-a-pizza and laughed and well, the name stuck...


IMG_1862


Perhaps one of the easiest things to make for dinner and also incredibly versitile... the only thing that i think one needs to keep in mind is this - if you arent using 'pizza sauce' (i wont judge you for using the store-bought stuff, i mean, it took me over a month to blog about this - i can hardly be judgemental), make sure to thicken up whatever you are using... the first time i made this i tried just using a basic tomato sauce and it was way too watery... the second time, i thickened it up with some tomato paste and that seemed to do the trick... if you dont have tomato paste but want to thicken your sauce up, just throw it in a sauce pan and heat it up for a little while - if you put it over medium heat, it should thicken up real quick - just be careful as if you leave it too long, you'll burn it...


Cheat-a-pizza
courtesy of me

one large size whole wheat pita
1/4 c tomato sauce
1 tbsp tomato paste
~20 herbed baby bocchini (fresh mozzarella, about the size of gumballs often packed with some oil and italian herbs. or could use plain and add more of your own herbs. You could also sub in any fresh mozzarella and just chop it up)
1 oz(?) oregon blue cheese, crumbled (not sure of the amount but not too much - maybe about golf ball size, pre-crumbling?)
red pepper flakes
italian seasoning
salt
pepper

Preheat oven and pizza stone to 350

mix tomato sauce and paste together

spread on pita, leaving 1/2 in border all around

arrange bocchini evenly on sauce

arrange oregon blue cheese around the bocchinis. remember that a little blue goes a LONG way and use sparingly.

season with any combination of red pepper, italian seasonings (oregano, basil or the good ol italian mix), garlic powder, salt, pepper, whatever... or save those for after it comes out - up to you!


Place on pizza stone (be careful - stone is HOT) and cook ~8 minutes or until cheese is nice and melty.... let sit for 2 - 3 minutes before cutting to allow cheese and sauce to 'set up' a bit...

2.06.2008

Cut, Paste & Assemble

when i'm not posting scintillating meals up here, i go to this big office where they pay me to do work. work that truly can be broken down into Cutting, Pasting & Assembling... so i figured that maybe i'd take that approach to this latest stolen recipe...


IMG_1227


Cutting: Extra-Firm Tofu, brussel sprouts, garlic, pecans and cilantro

Pasting: (we'll get to that in a minute)

Assembling: all of the ingredients once they are prepared...


and now for the pasting...


Caramelized Tofu Recipe
courtesy of 101cookbooks.com


7 - 8 ounces extra-firm tofu cut into thin 1-inch segments
a couple pinches of fine-grain sea salt
a couple splashes of olive or peanut oil
2 medium cloves garlic, minced
1/3 cup pecans, toasted and chopped
3 tablespoons brown sugar
1/4 cup cilantro, chopped
1/2 lb. brussels sprouts, washed and cut into 1/8-inch wide ribbons


Cook the tofu strips in large hot skillet (or pot) with a bit of salt and a splash of oil.
Saute until slightly golden, about 4 minutes.
Add the garlic and pecans, and cook for another minute.
Stir in sugar. Cook for another couple of minutes.
Remove from heat and stir in cilantro.
Scrape the tofu out onto a plate and set aside while you cook the brussels sprouts.

In the same pan (no need to wash), add a touch more oil, another pinch of salt, and dial the heat up to medium-high.
When the pan is nice and hot stir in the shredded brussels sprouts.
Cook for 2 - 3 minutes, stirring a couple times (but not too often) until you get some golden bits, and the rest of the sprouts are bright and delicious.

Serves 2 - 3 as a main, 4 as a side
Related Posts Plugin for WordPress, Blogger...