10.12.2011

Malfadine with Lemon-Asparagus Sauce

When i started this blog - about 4 years ago - it was to not only share recipes, but also to share the stories behind them. I lost that somewhere along the way. i lost some of the story.

Keeping that in mind, you have to forgive me for posting this recipe at the absolute wrong time of the year. This is a spring dish if i ever tasted one. but i made it this week. When yes, it was warm, but its still october...

However. If you know me in real life, you know that i've seen more than my fair share of Better Than Ezra shows. You know that i have friends - real life friends - that i wouldnt even know if not for my hours on their messageboard and my travels to their shows. You know that when i start talking about someone you dont know, you have to ask 'is that a BTE person?' and you know that quite often, the answer will be yes.

So why is that relevant?  because a funny thing happened along the way. all of us BTE people? we grew up. some became real adults and had kids. some bought houses. some moved - many times. some got married. some broke up. but through the miracle of the internet, so many of us have stayed in touch. held eachothers hands through breakups. been to eachothers weddings. sent presents to those kids. and among it all, theres a number of us who emerged as being almost as obsessed with food as we were with that band - at least 3 of us have food blogs. so now, instead of trading live show tapes, we trade recipes. We send treats to those having a hard time. and not so long ago, i sent 1.5lbs of pasta all the way to california, because one of those friends mentioned that she couldnt find malfadine near her.

now, of course, if someone wants a specific shape pasta for a specific recipe that badly, you know i have to try it too, right?

So that 1.5lbs of malfadine has been sitting in my cabinet waiting for me to get around to this...

DSC_0778

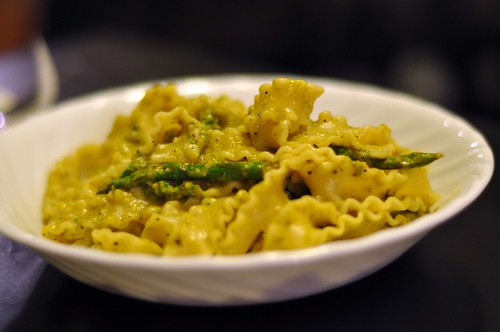
I ended up altering the original recipe a bunch, some based on reviewers suggestions, some pulled from other recipes we've known and loved (Cacio e Pepe, i'm looking at you), but the gist is the same... these long skinny lasagna-style noodles finished in an asparagus lemon sauce that just screams SPRING! (even if its October) when you bite into it...

and if you cant find malfadine near you? drop me a line - i'm an expert at shipping it ;)


Malfadine with Lemon-Asparagus Sauce
courtesy of me, loosely adapted from Epicurious

1/2 lb fresh asparagus, tough ends discarded, tips and remaining stems separated
1/2 tbsp salt

1 tbsp extra-virgin olive oil
1 tbsp softened butter
1 tbsp minced garlic
1/2 tbsp dried parsley
1/2 tbsp lemon zest
Juice of 1/2 of a lemon
1 tsp fresh ground black pepper

1/2 lb malfadine or other pasta of choice

1/3 cup grated Parmigiano-Reggiano

***

Boil a generous amount of water (you will use this water 3 times). Once boiling, add the salt to the water. Watch the volcanic eruption. its fun.

Chop asparagus stems into 1-2" segments. Cook the segments in the boiling water for 6-7 minutes or until very tender. Transfer segments to a colander, reserving cooking water in pot (a slotted spoon or small strainer works well), and rinse under cold water. Set aside.

Cook asparagus tips in same boiling water until just tender, about 3 minutes. Transfer tips to a colander, again reserving cooking water in pot and rinse under cold water and set aside,

Purée asparagus stems with oil, butter, garlic, parsley, zest, lemon juice, black pepper and 1/4 cup asparagus cooking water. (be careful, that water is hot)

Cook pasta in boiling asparagus cooking water for about 3/4 the amount of time suggested for al dente pasta. Reserve 1 cup of the cooking water, drain pasta and remaining water out of the pan.

Return pasta to the dry pan. Add in the asparagus tips, the pureed sauce and the reserved water and cook over high heat, stirring frequently to prevent burning and to ensure the ingredients are combining well. Allow to cook ~ 3 minutes, or until pasta is al dente, and the sauce has thickened and coats pasta well. (it will still be too 'loose' at this point - thats ok, the cheese will help...)

Remove from the heat and stir in Parmigiano-Reggiano. Stir until cheese is meltedand well combined.

Serve immediately, adding salt to taste.

10.10.2011

Introducing Pepperplate links!

(i'm going to wax poetic about my ipad for a moment here, but even if you dont have one, keep reading - this is for you too...)

so, about a year ago, i started thinking that maybe i wanted an ipad...  i'd spent many months making fun of what i felt was basically an overgrown phone that you couldnt use to make calls... (incidentally, my 3 year old nephew actually calls his dad's ipad 'the big phone') and didnt see why anyone would want one, but then, one day, it hit me.

i need this in the kitchen.

so when ipad 2 came out, i was right there on the pre-order bandwagon. I thought it would be great to have my recipes online instead of on random printed sheets all over the apartment.

and it was.

but, of course, i needed just a little more... So i went searching.

and i found the Pepperplate app.  a way to store recipes and turn them into menu plans?  score. exactly what i needed.

and, as it turns out, a lot more...

see, they have a website too (told you this wasnt all ipad love) and its amazing.  AMAZING.


Between the site and the app, you can do a million things...

  • import recipes directly from supported sites
  • use the bookmarklet on your browser to do a simple copy/paste of recipes from unsupported sites
  • create manual recipes
  • edit recipes for your modifications, no matter their origin
  • menu plan
  • create shopping lists, customized for your grocery store
  • keep your ipad awake while cooking in the app
  • share your recipes with others and allow them to import those recipes into their own pepperplate accounts.

and, oh yeah, its FREE.

So the other day i started thinking - how do i use this on Kitchen Hell?  So i tweeted the lovely @pepperplateapp people and asked - is there a way to create and share these links? and within moments, they got back to me with the details.

Therefore, from now on, any time i post a recipe, there will be a Pepperplate link under the title/creator - but before the ingredients - which will allow you to import that recipe into your own account.

(it also creates a clean print if you don't want to use an online version of said recipe)

I'll be going through the archives and adding links to old posts, but if you see any you want converted sooner rather than later, just drop me a line (or use the bookmarklet).

I hope you love Pepperplate as much as I do.  And no, this was NOT a paid or requested endorsement - i really, truly just think this site/app are that useful that i wanted to share :)

10.07.2011

Broccoli Mac & Cheese

When the weather starts to cool off, everyone's thoughts (mine included) turn to apples and pumpkin and maple syrup. However, when mother nature decided to skip the whole cooling off period a week or so ago and go straight to RAINY & COLD, I couldn't help but skip the normal cravings and move straight to comfort food.

Most people will agree that there really is no better comfort food than mac & cheese but for those who arent looking to fatten up for their winter hibernation, the comfort we seek in mac & cheese can quickly turn to distress when trying to get dressed in the morning and finding out that none of your clothes fit anymore because you've been eating a little too much comfort...

This leaves you with a dilemma - stop eating the warm comforting hug that is mac & cheese and keep that slammin' body or eat all the comfort and embrace the fatness?

I'm here to give you a 3rd option - do both.  and do it without sacrificing the stuff that makes mac & cheese the yummy goodness that it is...

Now, this recipe makes me feel a little bit like a mom who's trying to sneak vegetables into her kid's meal but really, the broccoli is a bonus, not a secret we're hiding under a layer of cheese (though that's how my mom got me to eat it as a kid...) and actually adds to the dish.

And you don't have to be on a diet to like it.  It doesn't taste like diet food!  I promise you, this mac and cheese tastes just as good as many other versions out there.  The bonus is that the vegetables are already built in, so you don't feel like you have to make a side in order to have a complete meal.

DSC_0774

It's a pretty versatile dish.  While the recipe below uses high-fiber pasta and reduced fat cheese, that's not really the calorie-cutting key - its much more about the fact that there is equal weight of pasta and vegetable soaking up all of that cheesiness.  I highly recommend playing around with it and coming up with the version you like best.  I'm already planning its successor as we speak ;)


Broccoli Mac & Cheese
courtesy of skinnytaste.com, with modifications by me
Click here to import to Pepperplate.com

12 oz high fiber pasta (we used Barilla Plus elbows)
12 oz fresh broccoli florets, any large pieces roughly chopped

2 tbsp butter
1/4 cup diced onion
1 tbsp minced garlic (about 2 cloves if you aren't cheating and using the pre-minced stuff)

1/4 cup flour

1 cup vegetable broth
2 cups 1% milk
1 tbsp garlic chili cholula sauce

8 oz (2 cups) shredded reduced fat mexican cheese blend
salt and fresh pepper to taste

1/8 cup grated parmesan
1/4 cup bread crumbs

***

Lightly grease a large casserole dish and set aside

Preheat oven to 375°

Prepare pasta in accordance with package directions for al dente pasta.  Include the broccoli in the water with the pasta for about 7 minutes  (this was al dente cooking time for our pasta, so everything went in together.  If you are using a pasta with a longer cooking time, just throw the broccoli in when there is 7 minutes left...)

While pasta & broccoli are cooking, heat 2 tbsp of butter over medium heat.  Add onion & garlic and cook for about 2 minutes to soften.

Lower heat to medium-low and whisk in flour.  It will clump and get dry - dont panic.  Keep whisking for a minute or two until it is all incorporated and the mess looks golden.

Add broth, milk and cholula, whisking to incorporate.  Raise heat to medium-high and heat, whisking often, until mixture is bubbling and gets thick.  (This will take anywhere from about 5 - 10 minutes, depending on your definition of medium-high)

Remove from heat and stir in cheese, in batches, until it has melted and is well-incorporated.  Season with salt and pepper to taste.

Add the pasta & broccoli into the cheese sauce and mix well to combine.

Pour the whole thing into your prepared baking dish.  Top with parmesan and then breadcrumbs.

Bake ~ 20 minutes and then turn oven up to 500° and bake for an additional 3 minutes to get the top a bit golden and crispy.

Allow to sit for at least 5 minutes before serving.

10.05.2011

Grandma P's MandelBread

We were not going to be able to celebrate Rosh Hashana with Jordan's family this year, but i knew it was important to him that we do something to mark the holiday.  Because Hallmark really doesnt have a 'high holidays' line in their stores, and no mythical characters show up with presents or chocolate,  the only marker i was left with was food.  (oh, darn.)  So I went on an elaborate recipe search all over the internets trying to figure out what to make.

The interesting thing i learned about Rosh Hashana is that the general gist of it is to eat sweet things, as a wish for a sweet new year.  This was a good thing to learn as holiday cooking is generally made more 'interesting' (and by interesting, i mean difficult) by my pescatarian lifestyle, but sweet is generally associated with desserts and such and desserts generally dont have meat in them.  This i could do.

After a bit of digging, i came up with a basic menu, which included honey cake.  When i ran it past Jordan, he was like, 'wtf is honey cake?' and i was like, 'its only what you are supposed to eat on rosh hashana, duh...' and he was all 'if you say so...'  So then we had one of those super-fun discussions that go 'ok if you dont want honey cake, what do you want?'  'i dont know...  no, its fine, i've just never had it before'  at which point i declared myself more jewish than him - which went over about as well as you can imagine...

so in the interest of saving the holiday (and maybe my marriage), i did more research.  and in that research, i saw that some people were making apple cake or mandelbread for dessert...  Now, i didnt know what mandelbread was, but when i mentioned it to Jordan, he was all 'i've been craving that!' and just like that, the world was now right in jordan's eyes.  so we called up his mom (ok, texted) and asked for his grandmother's recipe.*

Turns out mandelbread is basically biscotti. Except not always baked the second time the way biscotti is - and never baked the second time by Jordan's family.


DSC_0748

Now, you may wonder why I'm posting this now, after Rosh Hashana.  You may be saying 'um, maybe i could have used this if you'd only TOLD ME SOONER...'  well, Yom Kippur is this weekend and i'm pretty sure that this mandelbread would be a welcome addition to ANY break fast table...

*turns out that Grandma P used Mom S's recipe - something Jordan only learned a couple of days ago...  but i like the title Grandma P's, so i'm going to take that liberty, ok?


Grandma P's MandelBread
courtesy of Mom S.
click here to import recipe directly into Pepperplate

This is the full recipe.  We actually cut it down and only made 1/3 of the recipe (therefore one loaf) because there are only two of us and we're already fat enough...

1/3 c butter
1 c sugar
3 eggs
1 tsp vanilla
1 drop lemon juice
2 1/2 c flour
2 tsp bsking powder
1 bag chocoloate chips

sugar & cinnamon for top

***

Preheat oven to 350°

Prepare a cookie sheet with a piece of parchment.

Using an electric mixer, cream the butter and the sugar.

Add the eggs 1 at a time and mix well after each.

Add the vanilla, lemon and mix well.

Combine the flour and the baking powder in a separate bowl and add the flour mixture in batches, mixing well after each addition.  (I was able to keep using the electric mixer the whole time but it does get sticky at the end...)

Add the chocolate chips and mix to combine.

Flour your hands well and divide the very wet, very sticky dough into 3 pieces.  Shape each piece into a narrow loaf and place on the parchment.

Sprinkle each loaf with cinnamon and sugar. 

Bake for 30 minutes.

Allow to cool a bit and then slice as you would biscotti and serve.  

Note: Its a dry 'cake' - i'm told its best dipped in either milk or coffee, but i liked it just fine plain :)
Related Posts Plugin for WordPress, Blogger...